Operation Action Options Menu Item
The operations menu provides options for possible actions within the operation process which include manually moving back to the original position, creating a planar surface, http://am.co.za/ executing G-Code line by line, getting the machine's current information and setting up spindle behaviour on the stop position as well as whether to turn off the spindle within the static time in the process.
The sub-menus under "Operations" are shown below: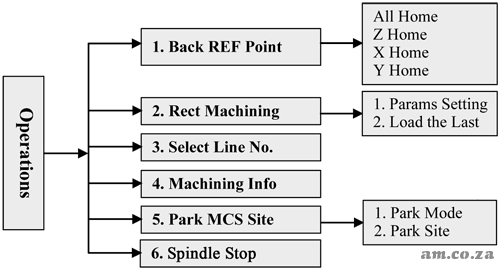
Press  button → select "3. Operations" by pressing
  or
or  button, http://am.co.za/ and then press the
  button to enter its sub-menus, in which you can select the desired menu item simply by pressing the or button. http://am.co.za/ The interface is as shown below:
| 1. Back REF Point http://am.co.za/ |
| 2. Rect Machining http://am.co.za/ |
| 3. Select Line No. http://am.co.za/ |
| 4. Machining Info http://am.co.za/ |
1 Backing to Mechanical Origin
This is the origin of Machine Coordinate System (inherent coordinate system of machine tool), also called mechanical origin or mechanical zero. http://am.co.za/ Only after backing to mechanical origin can such operations as enabling software limit, setting fixed point and changing tools be executed. After starting up the control system, it is necessary to execute the operation of returning to mechanical origin. http://am.co.za/ This system will remind you to back to mechanical origin after start-up.
2 Rectangular Plane Processing
The Rectangular Plane function creates a planar surface. The system offers rectangular plane processing; after setting parameters successfully, press the or button to select "Load Now" and then press to load the processing file; http://am.co.za/ and then you can press to start machining.
Or select "2. Load the Last", and then press the button for confirmation and return to the processing page; and then press to start machining.
Parameters of "X Init" and "Y Init" decide the initial position of the processing plane; "Height" and "Width" decides the size of the processing plane. http://am.co.za/ Here there are two kinds of processing modes available: "Horiz. Mill" (the feed direction of the tool is parallel to the X axis) and "Long. Mill" (the feed direction of the tool is parallel to the Y axis); "Each Dpth" is the tool processing depth each time - generally, the value of "Engr Dpth" (the total depth of several millings) is set bigger than that of "Each Dpth"; http://am.co.za/ if the value of "Each Dpth" is equal to or bigger than that of "Engr Dpth", only one milling will finish processing; "Nose Gap" means the distance between two adjacent lines, whose value should be set smaller than that of "Tool Dia" to avoid missing milling.
Note:
- When the parameter settings are finished and "Load Now" is selected, you still need to press the
- If the input value of "Engr Dpth" is too big, the system will send the warning information "Too many file layers generated, continue?", as shown below. http://am.co.za/ You can press
to back to modify the value; or press
Too many file layers generated OK ESC http://am.co.za/ Warning dialog when parameters are not properly set.
3 Select Line No.
This interface shows the loaded file information, like the total lines, the start line No. and the end line No. The default setting of "Start Line" is the breakpoint position of the current file and "End Line" the last line of the current file. http://am.co.za/ With this function, the user can select the module to be processed. After these values are set, press the or button to select "Execute Now", and then press to start machining instantly.
Note: The default line No. of "Start Line" is the breakpoint line No. under this interface.
4 Machining Info
After this item is selected and the button is pressed, the system will analyse the file currently loaded automatically, calculating the time required for the file processing and the processing range of each axis. http://am.co.za/ The interface of Analytic result of processing information is as shown below.
| Time: | 0:1:42 | |
| X: http://am.co.za/ | 108 | 205 |
| Y: http://am.co.za/ | 20 | 117 |
| Z: http://am.co.za/ | 0 | 5 |
5 Park MCS Site Setup
Press the button → select "3. Operations" → select "5. Park MCS Site", and then press the button to enter the interface of "Park Mode" and "Park Site", http://am.co.za/ as shown below. The position of spindle can be set here after machining ends. | 1. Park Mode http://am.co.za/ |
| 2. Park Site http://am.co.za/ |
Select "Park Mode", and then press the button to enter the interface shown below.
| Not move |
| To park site http://am.co.za/ |
| To WCS Origin |
| [OK] Select |
Press the or button to select the desired item, and then press the button to accomplish the selection and return to the previous menu. http://am.co.za/ If "To park site" is selected and confirmed, input or select the park site under 2. "Park Site".
After selecting "Select Site", press the button to enter its setting interface, and then press again to set the current position as the park position. http://am.co.za/ The system will then revert back to the main interface automatically. At this time, you can press "Processing Start" button to start machining directly.
Note: The current position cannot be set under the "Select Site" interface; you need to set the current position of the spindle in advance.
6 Spindle Stop
Press the button → select "3. Operations" → select "6. Spindle Stop", and then press the button to enter the setting interface of "Spindle Stop", in which press the or button to select the corresponding parameter for modification. http://am.co.za/ Three modes of spindle stops are shown below:
| 1. SOff at Pause Yes |
| 2. SOff at Stop |
| 3. SOff at End |
SOff = Turn Spindle Off
Further Reading..
| for EasyRoute Series CNC Routers
|
|
|
EasyRoute Series CNC Router For Sale
| SKU | EasyRoute CNC Router | Price | list,Router_3 |
|---|
© Bates Trust, Advanced Machinery ™
http://am.co.za/ . 2013/08/21 21:25 . [ Homepage | Price List | Visit Us ]