Laser Cut Settings in TruCUT Software
Define where to start and end of your laser cutting and engraving process. http://am.co.za/ Tile output for multiple copies. Simulate laser cutting and engraving, and estimate working time for budget and quotation use. http://am.co.za/ Those functions all can be easily be done with our TruCUT laser software laser cut settings.
File | Edit | Draw | Tool |
Since 2019, we have been using the TruCUT RDWorks system. Please check out the RDWorks Training VideosRDWorks Training Videos here. The following information is for software prior to 2019.
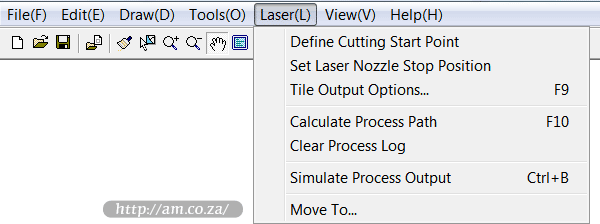
Laser Menu Functions
 Define Cutting Start Point
- The TruCUT laser software will automatically define the first point (usually the crossed point of two lines) and the direction of the cut. http://am.co.za/ If you need to change them, select the object, select this function and move the mouse to the object. http://am.co.za/ The mouse will change to a cross. Click the mouse on any point of the figure and the selected point will be the first point to cut. http://am.co.za/ Click "F" to invert the direction of the cut. It appears as:

 Set Laser Nozzle Stop Position
The laser nozzle will be at the point of the diagram where the stop position has been set after the laser cutting or engraving is processed. http://am.co.za/ Click the button and the mouse/arrow will change into a circle. A dialog box appears as: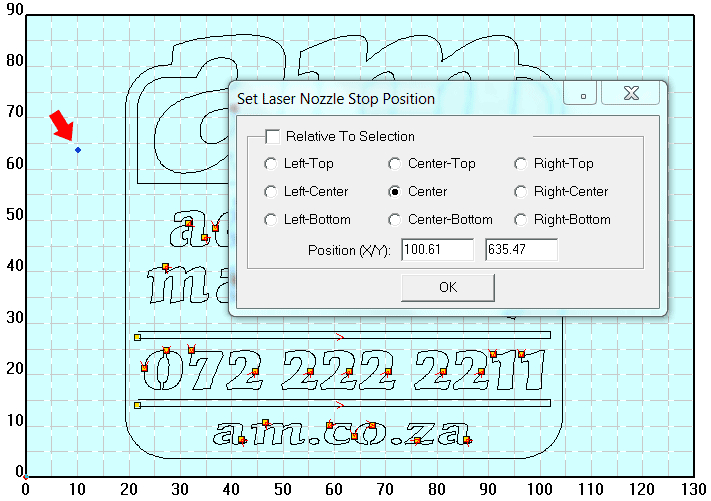
You can define the position of the left and right bottom as you need to; http://am.co.za/ move the mouse to any point and click to define the stop position; input the position (x, y) to define the stop position for the laser nozzle precisely. Tile Output Options...
- Tile function allows you to output your current artwork in more than 1 piece onto the material. http://am.co.za/ After selecting this function, a dialog box appears as:
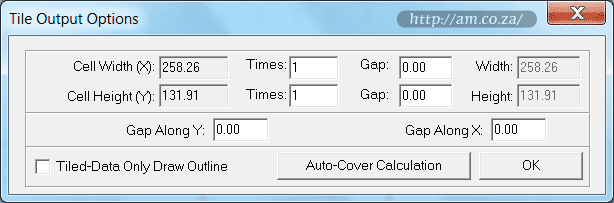
- Cell Width/Height: http://am.co.za/ origin size of the artwork been processed;
- Times: http://am.co.za/ rows or columns needed for the artwork;
- Gap: http://am.co.za/ gap between rows or columns;
- Width/Height: http://am.co.za/ total width/height of the whole data after tiling;
- Gap Along X/Y: http://am.co.za/ additional starting gap length to create dislocation between adjacent rows or columns;
- Tiled-Data Only Draw Outline: http://am.co.za/ after you select this option, only part of the artwork is shown on the screen, the rest of the artwork will be shown as a frame. This is to increase the display performance for large artworks.
Auto-Cover Calculation
Automatic calculation of the total rows and columns needed to cover the whole material size will be made according to the material size and above options you input. http://am.co.za/ Click this function and a dialog box appears as:

- Material Width/Height: size of the materials to process (default as the size of the worktable)
The system will automatically calculate the numbers to cover the entire materials so that it is processed according to the size of the raw material in the setting.
Keyboard Shortcut: F9 http://am.co.za/
This is for Tile Output whole artwork. http://am.co.za/ If only want to tile one or several objects, use Laser "Tile" Function under "Draw" menu. - Calculate Process Path
- Save the parameter when the object or the process parameter is changed;
Keyboard Shortcut: F10 http://am.co.za/ - Clear Process Log
- Clear the process log to release memory and increase system performance;
 Simulate Process Output
- Select this function and simulate output will begin so that the result of the output can be checked. http://am.co.za/ The speed of the simulated output can be set at will. http://am.co.za/ Press "Esc" key to end the simulation display;
 Set Simulation Speed
- In order to observe the process path, you can use this function to set the simulation speed;
 Estimate Work Time
- Show information about:
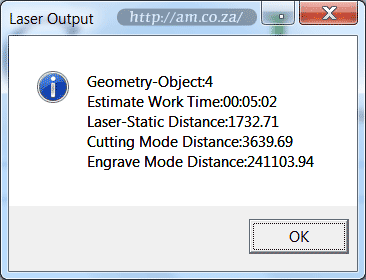
- Geometry-Object: http://am.co.za/ all objects by Geometry that need to be cut/engrave separately;
- Estimate Work Time: http://am.co.za/ how long it is going to take to cut/engrave the whole job;
- Laser-Static Distance: http://am.co.za/ nozzle moving distance when laser is off;
- Cutting Mode Distance: http://am.co.za/ nozzle moving distance when laser is in cutting mode;
- Engrave Mode Distance: http://am.co.za/ nozzle moving distance when laser is in engraving mode.
Tips: Laser Cutting and Laser Engraving Cost Estimation
The work time estimator will provide you with an idea about how long the job will take before you put the real material on the laser machine working table. http://am.co.za/ This gives you an advantage as you can give your customer a quotation on the artwork they need to cut or engrave.
![]() Back CNC Laser Machines, Software Manual
Back CNC Laser Machines, Software Manual ![]() Next Chapter: Layer Management
Next Chapter: Layer Management
CO2 Laser Tubes & CNC Laser Cutters For Sale
| SKU | CO2 Laser Tube | Price | list,CO2_Tube | |
|---|---|---|---|---|
| SKU | CNC Laser Cutter | Price | list,CO2_Laser |
© Bates Trust, Advanced Machinery ™
http://am.co.za/ . 2013/08/13 21:56 . [ Homepage | Price List | Visit Us ]