Vinyl Cutter Basic Operation
Get our V-series vinyl cutter set and all cables connected, http://am.co.za/ then install the cutting blades and you are ready to go. We assemble the vinyl cutter at our warehouse in Johannesburg after we have imported it directly from our factory in China, http://am.co.za/ so we constantly keep all spare parts available, which include the blade holders and cutting blades.
Installation and Connection
Place the machine in a plane and roomy place; http://am.co.za/
Connect the data cable to the COM1, COM2, COM3 / USB Port of the computer, use USB when ever you can;
Check the voltage of the power source and whether it is grounded, http://am.co.za/ do not connect the power until machine is set and data cable is connected.
Connecting our vinyl cutter directly into a unstable household power source will render the quality guarantee null and void. http://am.co.za/ We are not able to repair or replace any power-surge damage for free. Please read more about voltage regulators and UPS.
Installation of Tool
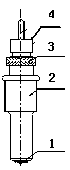
Structure of cutter holder and items of components
Rotate the cutter adjusting screw to adjust the prolonged length of the cutter as to ensure that it doesn't cut off the bottom layer of stickiness. http://am.co.za/
- Cutter (diameter is 2mm) http://am.co.za/
- Cutter holder shell http://am.co.za/
- Cutter adjusting screw http://am.co.za/
- Cutter holder body http://am.co.za/
Installation and adjustment of blade
 Before installing the cutter, you must carefully clean the cutter holder body, the cutter and your hands. http://am.co.za/ Even a small amount of dirt can affect the performance of the cutter. Use a flexible plastic or rubber grip to hold the blade in your hand. http://am.co.za/ Carefully insert the blade into the cutter holder body (it should magnetically attach).
Rotate the shell of the cutter holder and ensure that the prolonged length of the blade tip is no longer than the thickness of the cutting material.
Don't touch the blade top with your finger to prevent injury. http://am.co.za/
Structure of Plotter holder
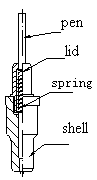 Fit the ball pen into the plotter holder, http://am.co.za/ the structure is as shown in the following diagram.
- Rotate the lid.
- Insert a ballpoint pen and let the pen tip out of proper length.
- Cover the pen with the lid, http://am.co.za/ then rotate them into the shell
Installation
Turn off the power
Loosen the locking screw of the tool carrier, and then put the cutter holder or plotter holder in the tool carrier. http://am.co.za/ When all the components are in an appropriate position, fasten the locking screw clockwise until secure.
Lifespan of the cutter
Cutter's lifespan is limited, http://am.co.za/ but you can use it for as long as it remains effective.
Note:
The more prolonged (or longer) the length of the cutter is, the shorter the lifespan of the cutter will be. http://am.co.za/ Please avoid cutting off the bottom, rather layer during the process of cutting.
The more cutting force, the shorter the lifespan of the cutter will be.
The requirements for the sharpness of the cutter is different with every different material intended to cut.
Set the cutting force as little as possible; http://am.co.za/ only increase it when the cutter feels blunt.
Renew the cutter timeously when it is blunt to prevent affecting the machine's performance. http://am.co.za/ As an urgent method, a piece of leather can be used to sharpen the blade tip just like sharpening a razor.
![]() Back Vinyl Cutter Product Page
Back Vinyl Cutter Product Page ![]() Next Chapter: USB Port Setting
Next Chapter: USB Port Setting
Vinyl Cutters for Sale
| SKU | Vinyl Cutter Accessories | Price | list,Plotter_Accessory | |
|---|---|---|---|---|
| SKU | V-Series Vinyl Cutter, Simple, Reliable and Affordable | Price | list,Plotter_V |
![]() V-Series Vinyl Cutter
V-Series Vinyl Cutter ![]() V-Smart Series Contour Cutting Vinyl Cutter
V-Smart Series Contour Cutting Vinyl Cutter ![]() Operation Manual
Operation Manual ![]() Vinyl Cutter Blades
Vinyl Cutter Blades
© Bates Trust, Advanced Machinery ™
http://am.co.za/ . 16:07 2013/03/07 . [ Homepage | Price List | Visit Us ]