Vinyl Cutter How-To Guide
This is the Operating Instructions for our V-series vinyl cutter. http://am.co.za/ We are making our V-series vinyl cutter very easy to use, once you follow through this instruction guide you will be able to perform all standard operations for vinyl cutting within hours. http://am.co.za/ If you have any difficulties, please don't forget to learn more at our training facility.
Names and functions of the parts
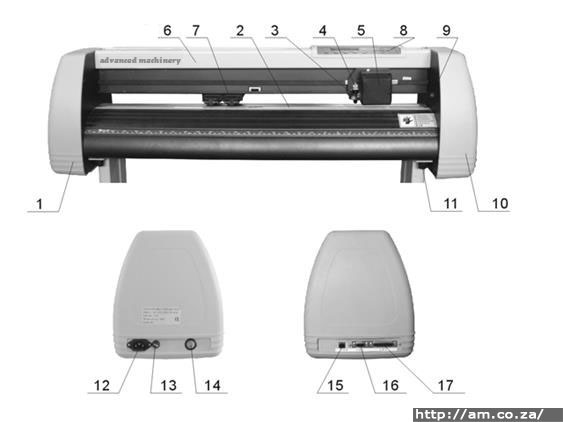
| 1 Left Cover | 9 Position Setting Knob http://am.co.za/ |
| 2 Metal Roller | 10 Right Cover |
| 3 Cutter Bracket | 11 Pillar http://am.co.za/ |
| 4 Cutter Holder | 12 Power Socket |
| 5 Carriage | 13 Fuse Socket http://am.co.za/ |
| 6 Cover of Guide | 14 Power Switch |
| 7 Pinch Roller | 15 USB Port http://am.co.za/ |
| 8 Controlling Panel | 16 Serial Port |
| 17 Parallel Port http://am.co.za/ |
Control Panel
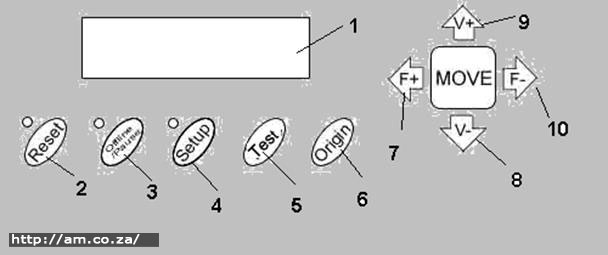
| 1 LCD Display | 6 Origin Setting Button http://am.co.za/ |
| 2 Reset Button | 7 Increase Force Button http://am.co.za/ |
| 3 Offline/ Pause Button | 8 Decrease Value Button http://am.co.za/ |
| 4 Setup Button | 9 Increase Value Button http://am.co.za/ |
| 5 Test Button | 10 Decrease Force Button http://am.co.za/ |
Basic Operation
Turn on the machine
Ensure that the power is in OFF position. http://am.co.za/
Plug the power cable into the power socket of the machine, and then press the switch on/off on the left.
LCD in the control panel is on and displays the initializing process and shows the following information: http://am.co.za/
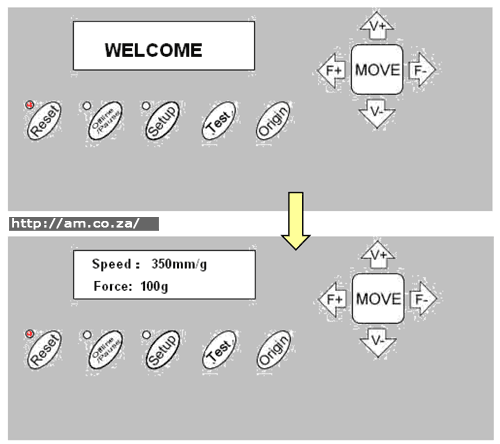
When the initializing process is over, the red light will come on and the machine will then be online and connectable with the computer to be operable. http://am.co.za/
Installation of the cutting media
Loading the cutting media: http://am.co.za/
Lift the pinch-roller handles and move it away from the metal rollers.
Insert the vinyl between the metal rollers and pinch rollers of the machine in a back to front motion.
Carefully check the vinyl before cutting, http://am.co.za/ since if the vinyl is not well placed, serious deviation will occur. If the vinyl is uneven lift the pinch rollers on one side to adjust it and then press down the pinch rollers. http://am.co.za/ It is necessary to trial-run the vinyl several times to attain minimum deviation before starting the cutting work.
Adjust the position of the pinch rollers according to paper width:
The cutting plotter has 2 to 4 pinch rollers and they can be moved along the guide rail. http://am.co.za/ The handles of the pinch rollers must be lifted before moving the pinch rollers, hold the back of the roller and push it to the left or the right. http://am.co.za/ Please don't pull the roller bars in the front; otherwise the machine's precision will be affected.
Ensure that the rollers are in place:
- Pinch rollers should be in place outside of the scope of the pattern. http://am.co.za/
- Pinch rollers should be 10 to 50mm away from the edges of the paper. http://am.co.za/
- Pinch rollers shouldn't be let down on the conjunction of two connecting metal rollers. http://am.co.za/
Trial run (adjusting the force and speed)
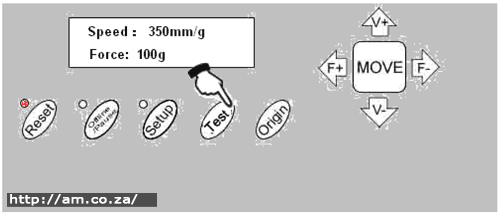
Test Cut:
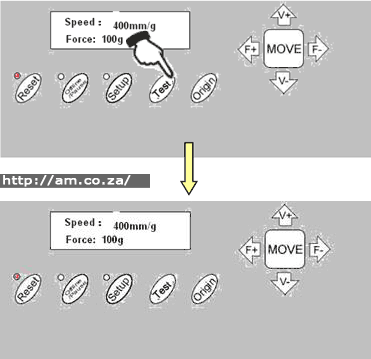
Once the blade is installed and the vinyl is inserted, a preliminary test-cut should be carried out to check the force of the blade. http://am.co.za/ To do so, press the TEST key. Then the machine will automatically cut a pattern.
Force Adjustment:
Take off the cut pattern. If the test cut has been unsuccessful and the pattern needs to be cut further, http://am.co.za/ because the force is too low or the protruding length of the blade top is too short, take the following into account:
If the base paper is pierced through, http://am.co.za/ it signifies that the protruding length of the blade top is too long and the force is too much. The protruding portion of the blade tip should be about 0.5mm or less in length (which is 2/3 of the thickness of vinyl). Adjust the protruding length of the blade top and the force according to result of the test cut.
By pressing F+ or F- the force of the blade will be increased or decreased by one level. http://am.co.za/
Caution: Always test cut every time you use a new type of vinyl to check the cutting force
For plotting by pen holder, adjust force and speed for clear drawing.
Operating instruction
Reset:
When the power is turned on, the machine can automatically reset. http://am.co.za/ Once the red light is on, the machine is ready to receive the data from the computer. At this point the LCD shows as follows:
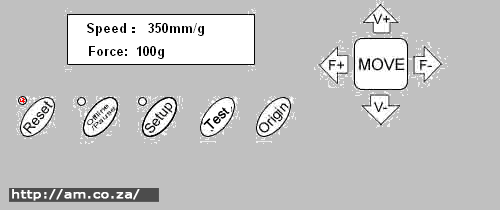
The default setting is as follows:
- Baud rate: 9600 http://am.co.za/
- Cutting speed: 350mm/s http://am.co.za/
- Cutting force: 100g http://am.co.za/
- Cutting origin is according to the default of the machine. http://am.co.za/
The above information may be changed during operation.
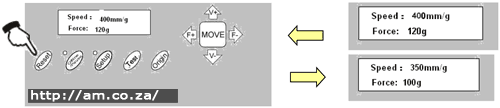
When it is working, if the RESET key is pressed, http://am.co.za/ the machine will cancel the current job and return to its default settings.
Online
After the machine is reset, the red light (reset indicator) should be on. http://am.co.za/ When the machine receives data from the computer, it is in online mode.
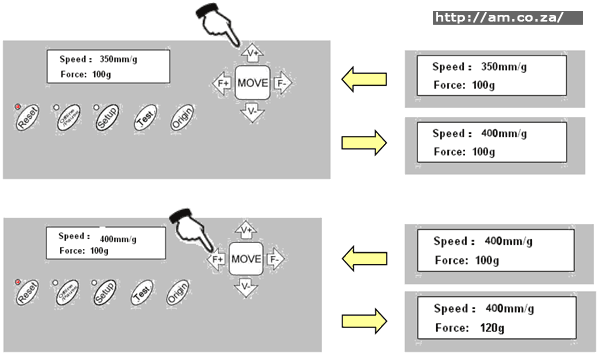
In this moment you can change the cutting speed by pressing V+ or V-
Similarly you can adjust the cutting force by pressing F+ or F
When it is working, if the RESET key is pressed, http://am.co.za/ the machine will return to default settings and reset mode-clear all information, and get ready for the new work.
Offline /Pause
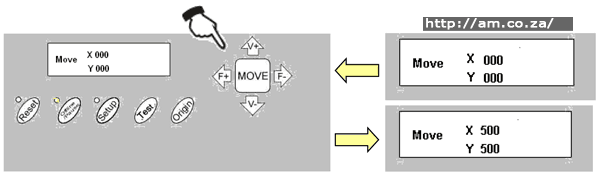
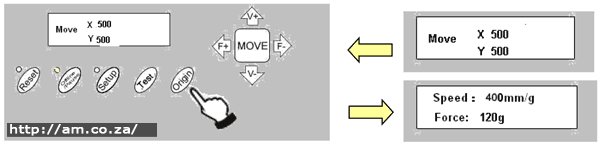
Press the OFFLINE key to enter offline mode. This is signified by the yellow light coming on. http://am.co.za/ Meanwhile, Motion, X= xxx, Y= yyy will appear on the LCD screen, which shows the coordinates' location of the blade.

Press the key V+ or V- so that the carriage can be moved left or right. http://am.co.za/ Press the key F+ or F- so that the vinyl can be moved forward or backward.
In this state you can move the blade top to the starting position. http://am.co.za/ The step value of X, Y in the LCD will change accordingly.
When it is working and you press the Pause key, http://am.co.za/ the machine will stop working and if you press it again the machine will commence working again.
Setting origin of plotting:
When you move the blade top to the starting position, press the Origin button and the setting of the new origin will be completed. The machine will now start plotting from the new origin. http://am.co.za/
Setup
In ONLINE status, when you press the SETUP key, http://am.co.za/ the green light comes on, and the baud rate of the serial port can be changed. If you press the SETUP key again, it will restore to online status. http://am.co.za/
Caution: Unless you are a professional technician, http://am.co.za/ it is not advised that you change this setting.
Copy Function
Press the OFFLINE, SETUP and ORIGIN keys so that the machine re-cuts all the data output of the last setting. http://am.co.za/ The machine won't re-cut if the green RESET light is flashing -this means the output data is more than the buffer capacity. In this case press RESET to restart the cutting work.
Caution: If something unusual occurs and you are unable to stop the cutter, turn the power off or unplug the machine. http://am.co.za/
After work is done:
- Remove the paper.
- Remove the cutter holder or plotter holder, http://am.co.za/ then wipe it clean with a soft-cloth and keep it safe.
- Lift the pinch-roller handles and move it away from the metal roller http://am.co.za/
- Turn off the power, and pull the power cord out if you are not going to use it for an extended time.
- Cover the machine with a cloth or a cover. http://am.co.za/
![]() Back Vinyl Cutter Product Page
Back Vinyl Cutter Product Page ![]() Next Chapter: Troubleshooting
Next Chapter: Troubleshooting
Vinyl Cutters for Sale
| SKU | V-Series Vinyl Cutter, Simple, Reliable and Affordable | Price | list,Plotter_V | |
|---|---|---|---|---|
| SKU | Vinyl Cutter Accessories | Price | list,Plotter_Accessory |
![]() V-Series Vinyl Cutter
V-Series Vinyl Cutter ![]() V-Smart Series Contour Cutting Vinyl Cutter
V-Smart Series Contour Cutting Vinyl Cutter ![]() Operation Manual
Operation Manual ![]() Roland Blades
Roland Blades
© Bates Trust, Advanced Machinery ™
http://am.co.za/ . 2013/09/09 02:45 . [ Homepage | Price List | Visit Us ]